Hello Everyone!
In the following post, I will be describing my process in designing my latest game, “The Sky House“.
First of all, I would like to thank Joni Kittaka, Ben Benal, Michael Cook, Chris DiMauro, Michael Fewkes, and Fernando Silva for their feedback that helped in improving the overall game and making it more accessible and less evil :D.
I will divide this topic into three separate blog posts because “The Sky House” consists of 42 scenes which would take too much time to write and too much space for just one. This series of posts contains a lot of spoilers, so please play the game first before reading.
The idea for this game started a long time ago after I finished a tiny game with Samer Abbas for the GameZanga (GameZanga is an Arabic game jam that happens every year in the MENA region) called “Loss“. I liked the idea of having a winged character with very precise controls that allows the player to avoid most of the traditional platform’s challenges (as I am not good with most platformers that utilize momentum). For a long time, I was trying to find the best environment to introduce this character until I remembered playing a game by “Roger Hicks” called, “Celestial Mechanica“. I remembered how much I was fascinated by the idea of the flying citadel (you can notice the similarity between that and my flying house). At that time, “PICO-8” was becoming very famous and I wanted to experiment with it before buying. As a PhD student, I have very little money in general. When I Googled “free alternatives,” I found “TIC-80” which is an fantastic open source fantasy console. I decided to build my game in TIC-80.
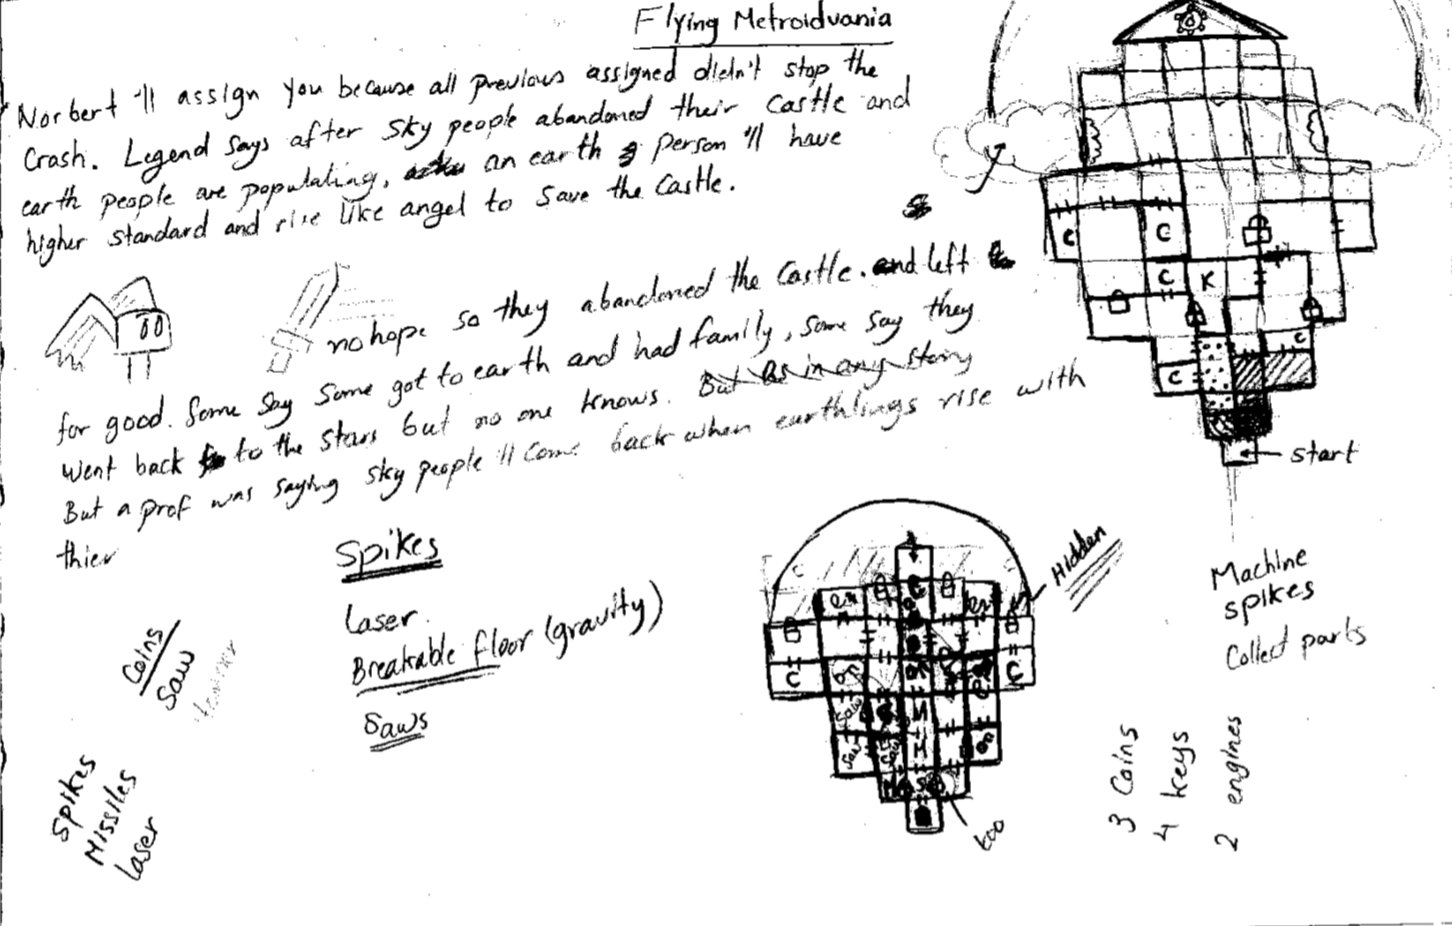
The above images show my first draft of the game’s main story, the challenges, and the overall map which has connections inspired by “The Legend of Zelda” and “Metroid” series. I wanted the player to be able to see the different locked branches from the beginning of the game. I also wanted to use the “soft locks” idea similar to the one used in the first “The Legend of Zelda” and the latest, “Breath of the Wild” for controlling the order of visiting the different dungeons. Locks in general are used to guide the player towards an optimal way to finish the game. Soft locks use very difficult challenges for the player’s current skill level. Soft locks provide the feeling of openness instead of having better guidance while hard locks are used to have a more carefully guided experience.
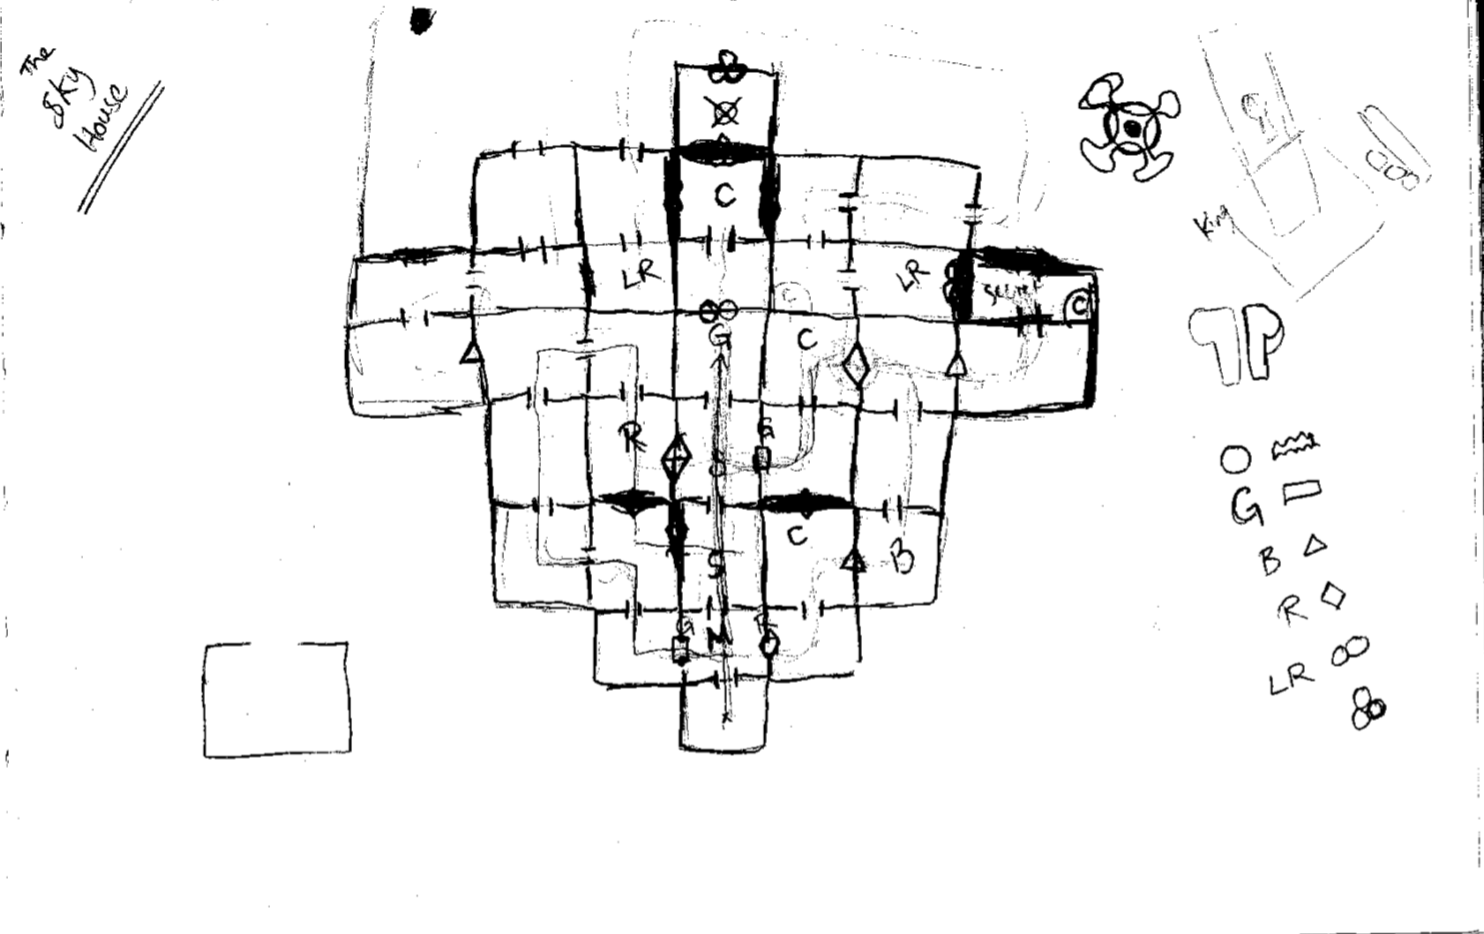
In the image above, you will see the final overall game map as represented in the TIC-80 editor. You can see the similarity of the connections between the initial map draft and this one, however, I changed a little bit of the idea of using soft locks. I only used the soft locks for secrets, hidden areas, and dead end areas. I made sure that there is always something to be done in any dead end path to give the player a sense of achievement and reward. The player can find collectible coins, shortcuts, or hints for the secrets in other rooms. I also made certain that any secret in the game is hinted to, somehow, either by using the art or the layout of the level. Doing so helps the players to find the secrets without spending time bumping into every wall in the game.
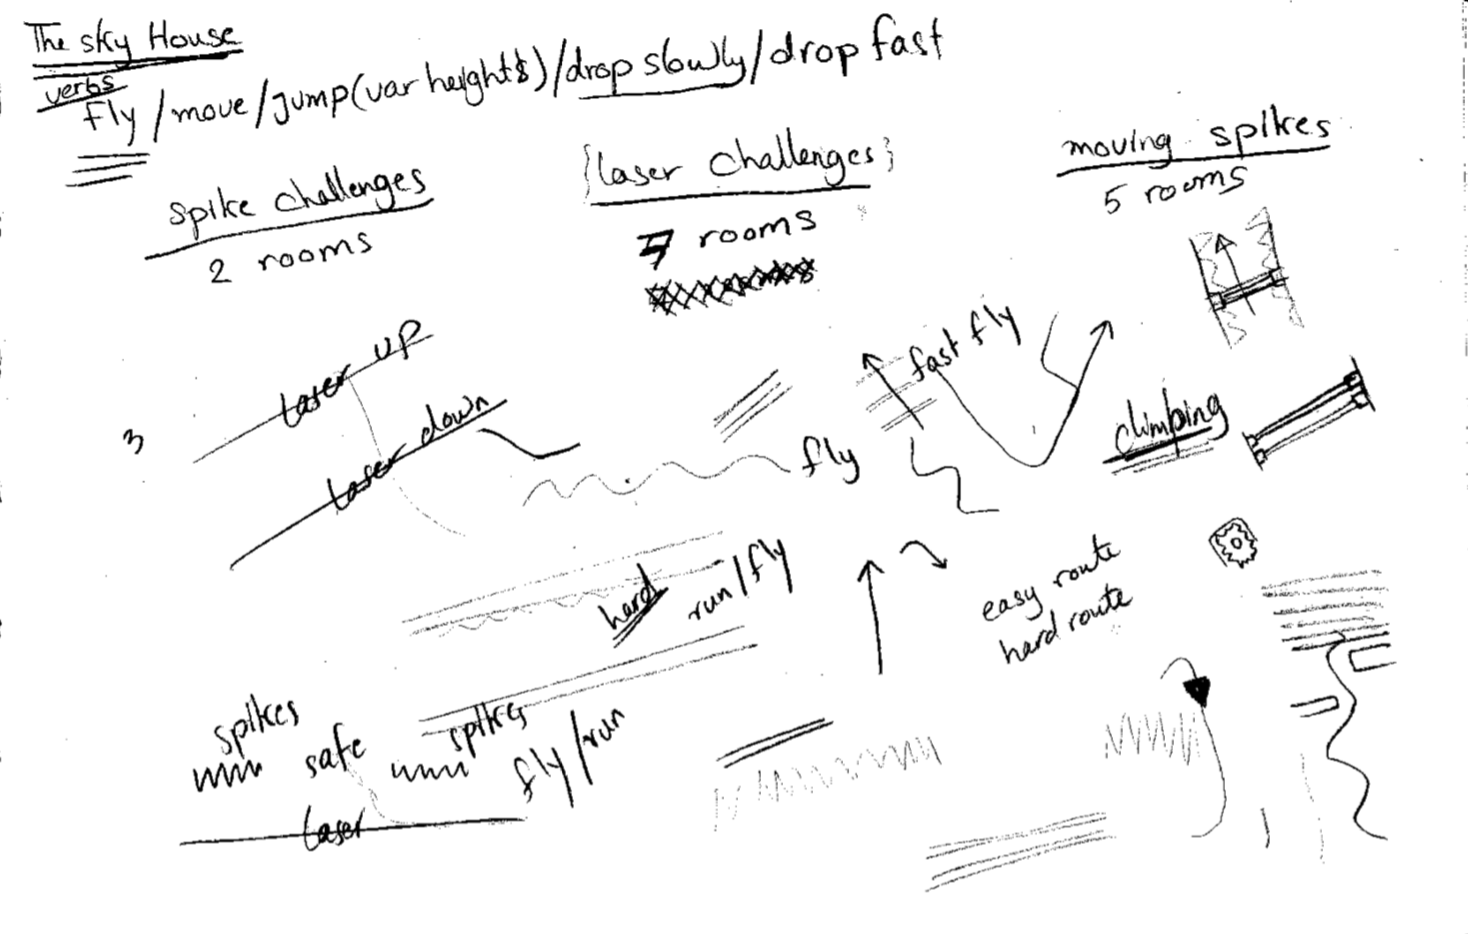

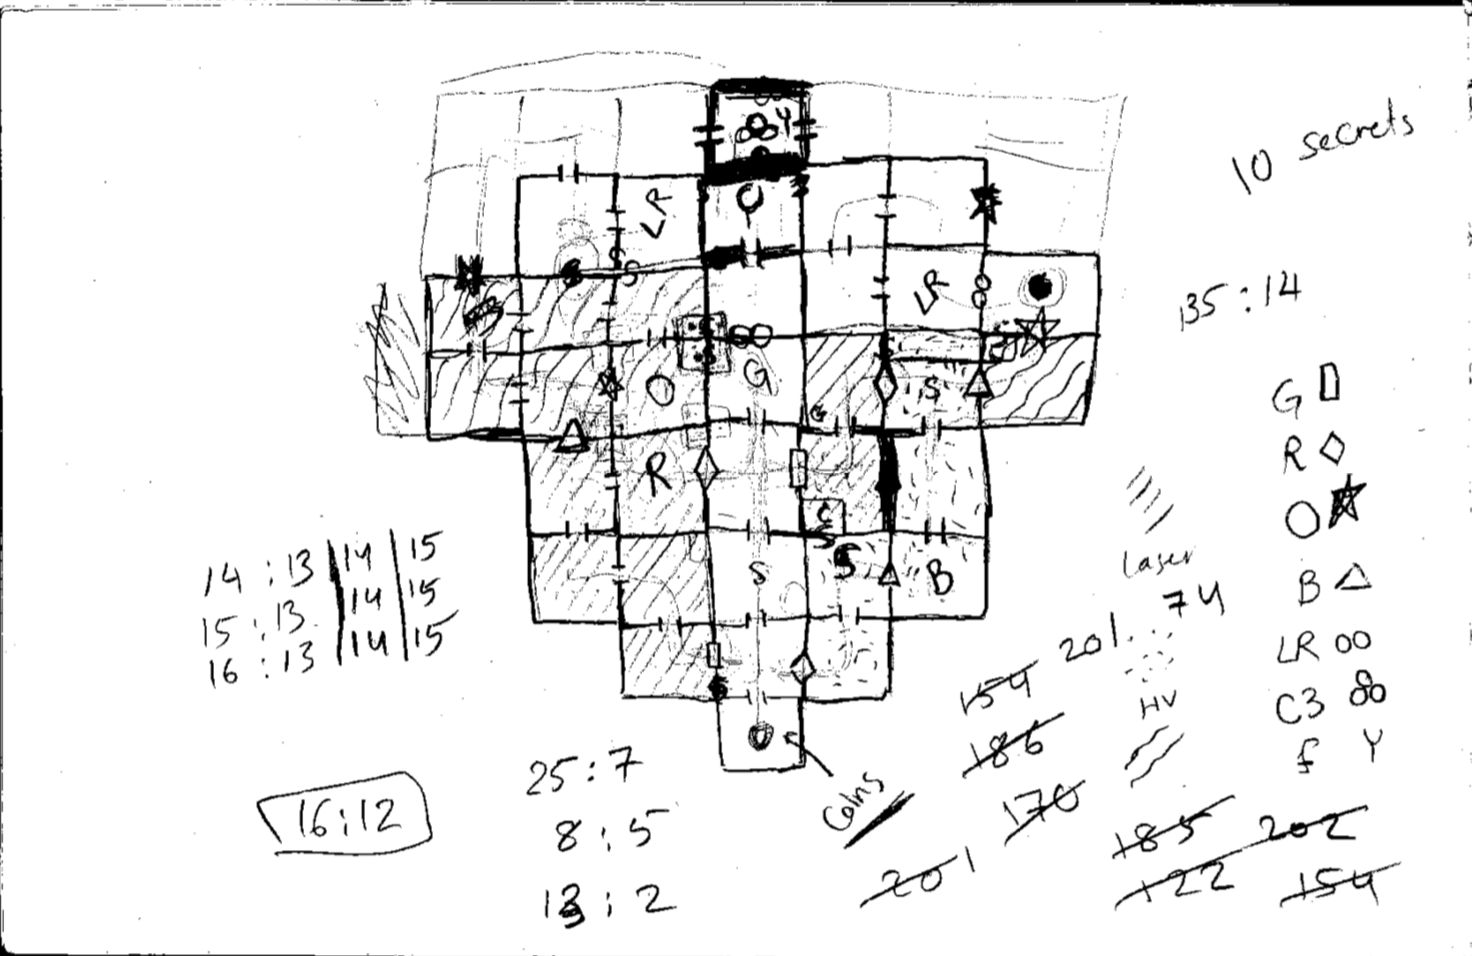
Most of my knowledge in designing this game came from reading Anna Anthropy‘s amazing book “A Game Design Vocabulary” and playing “REDDER” and “VVVVVV“. The images above are notes from my notebook after I got my first feedback on the game, and were used to redesign some of the challenges to make it more focused on the core verbs (mechanics). “The Sky House“‘s core verbs can be seen in the first page: Fly, Move, Jump, Drop Slowly (Gliding), and Drop Fast. Every challenge in the game revolves around these verbs – especially Fly and Glide as these are what make “The Sky House” stand out among similar games. You will also notice that I decided not to use any text inside the game either for story or for guiding the player, similar to the approach used in “REDDER“.
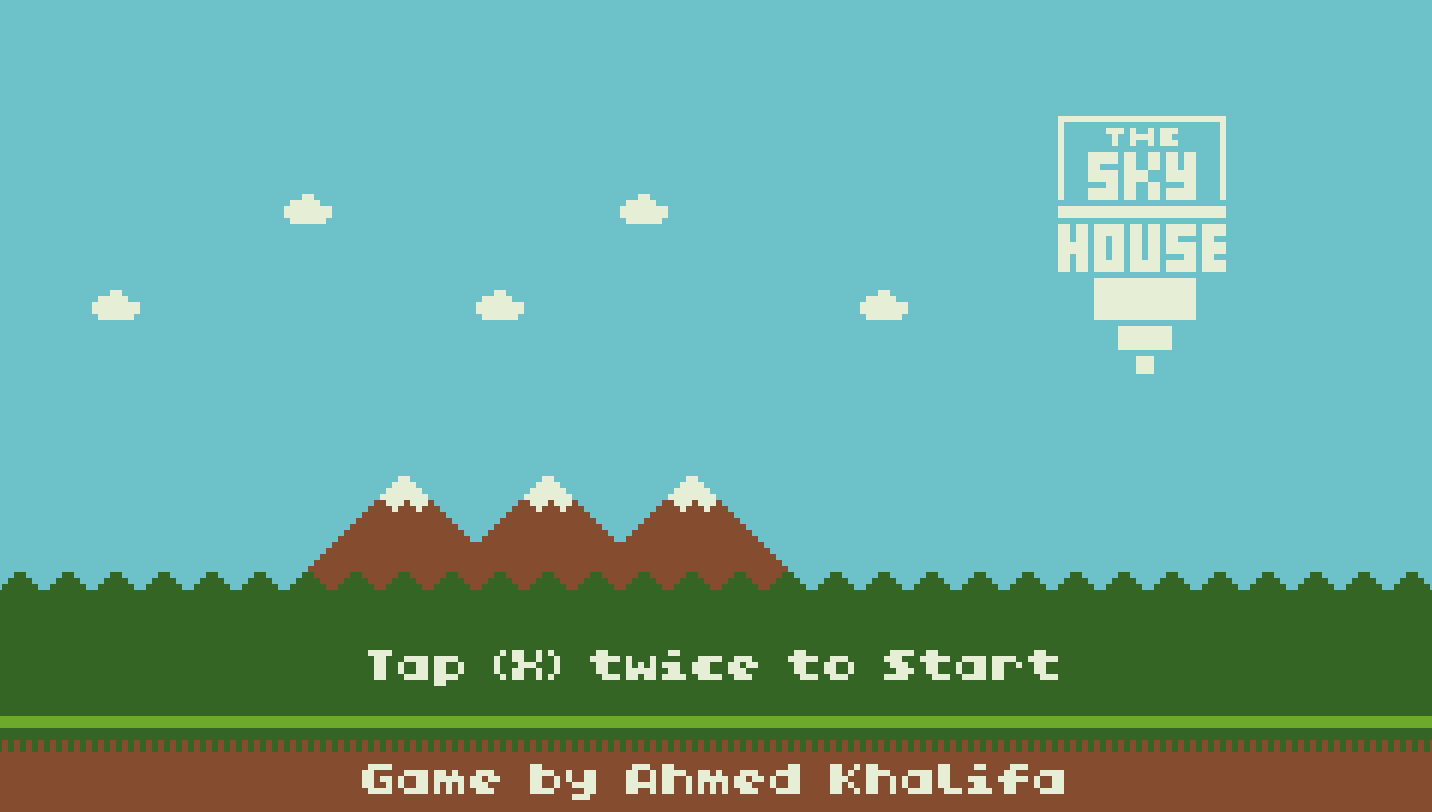
This image shows the game’s title screen. The game starts by pressing the “X” button twice instead of one time to give a hint to the player that pressing “X” twice is an essential element of the game.
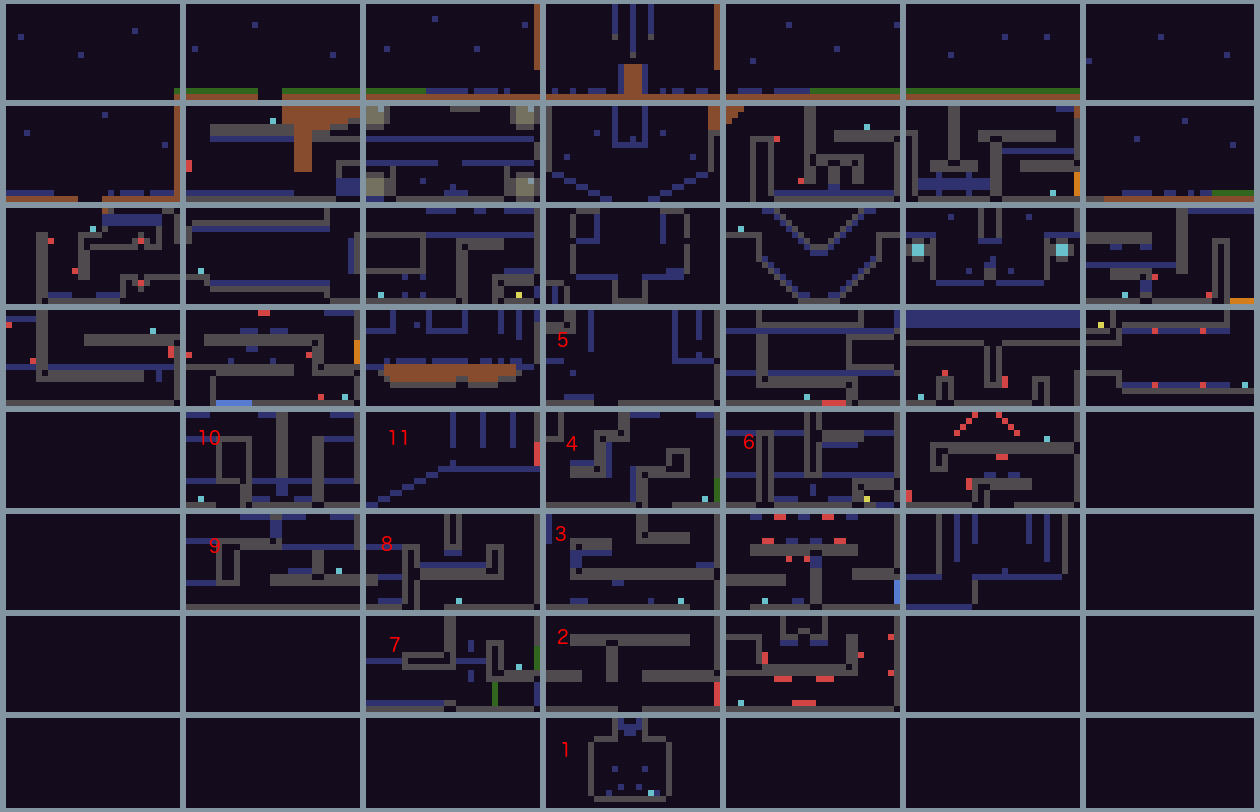
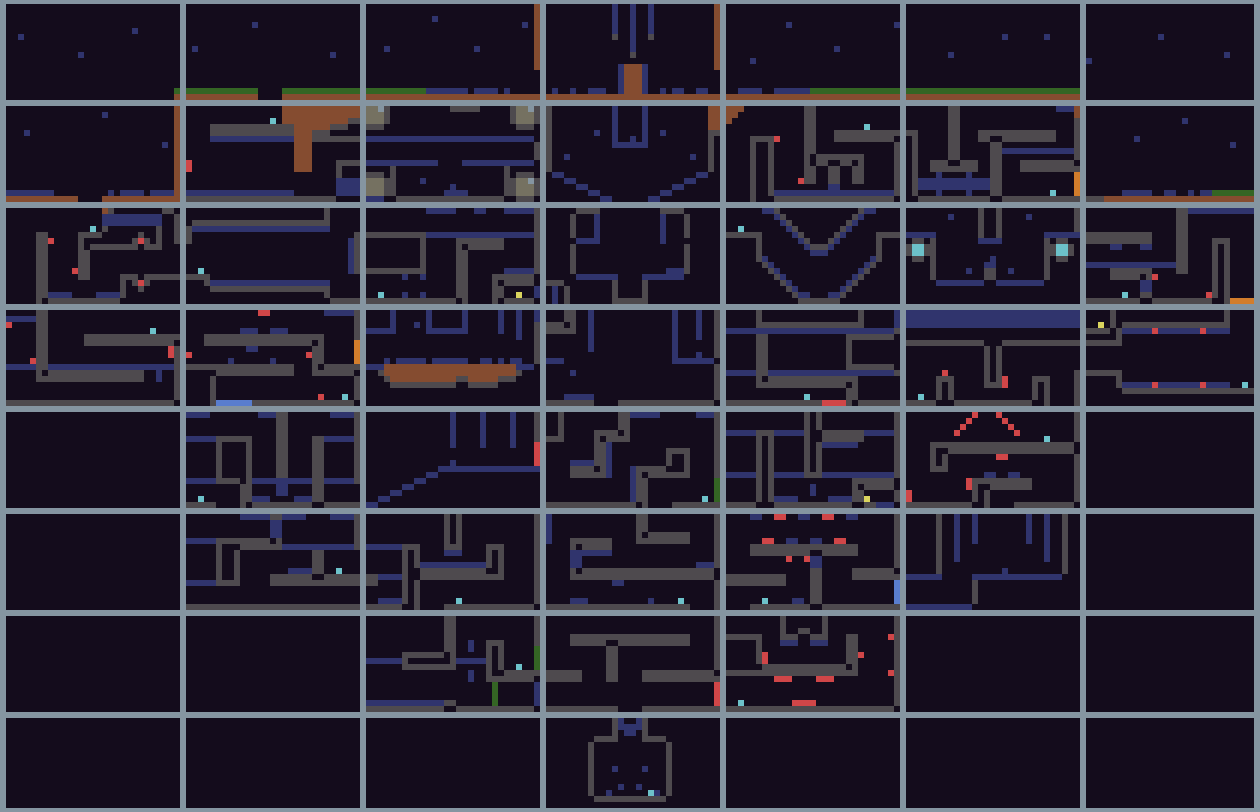
To easily explain the rooms in the game, the overall map shows rooms with corresponding numbers beside them. The numbers are written in same order that I will explain the rooms. To jump to a specific room, click the links below:
| Room1 | Room2 | Room3 |
| Room4 | Room5 | Room6 |
| Room7 | Room8 | Room9 |
| Room10 | Room11 |
I would like to note that the world of the game is divided into multiple regions – like in “Metroid” – with each region having a different set of challenges ramping from easy to hard as the player advances, ending with the player getting a key. In this first part of the blog series, you will notice that Room1 to Room5 are the first region while Room6 to Room11 are the second region. The first region helps the player to learn the basic verbs and uses spikes as the core challenge. The second region is more about precise control and timing, adding on laser challenges.

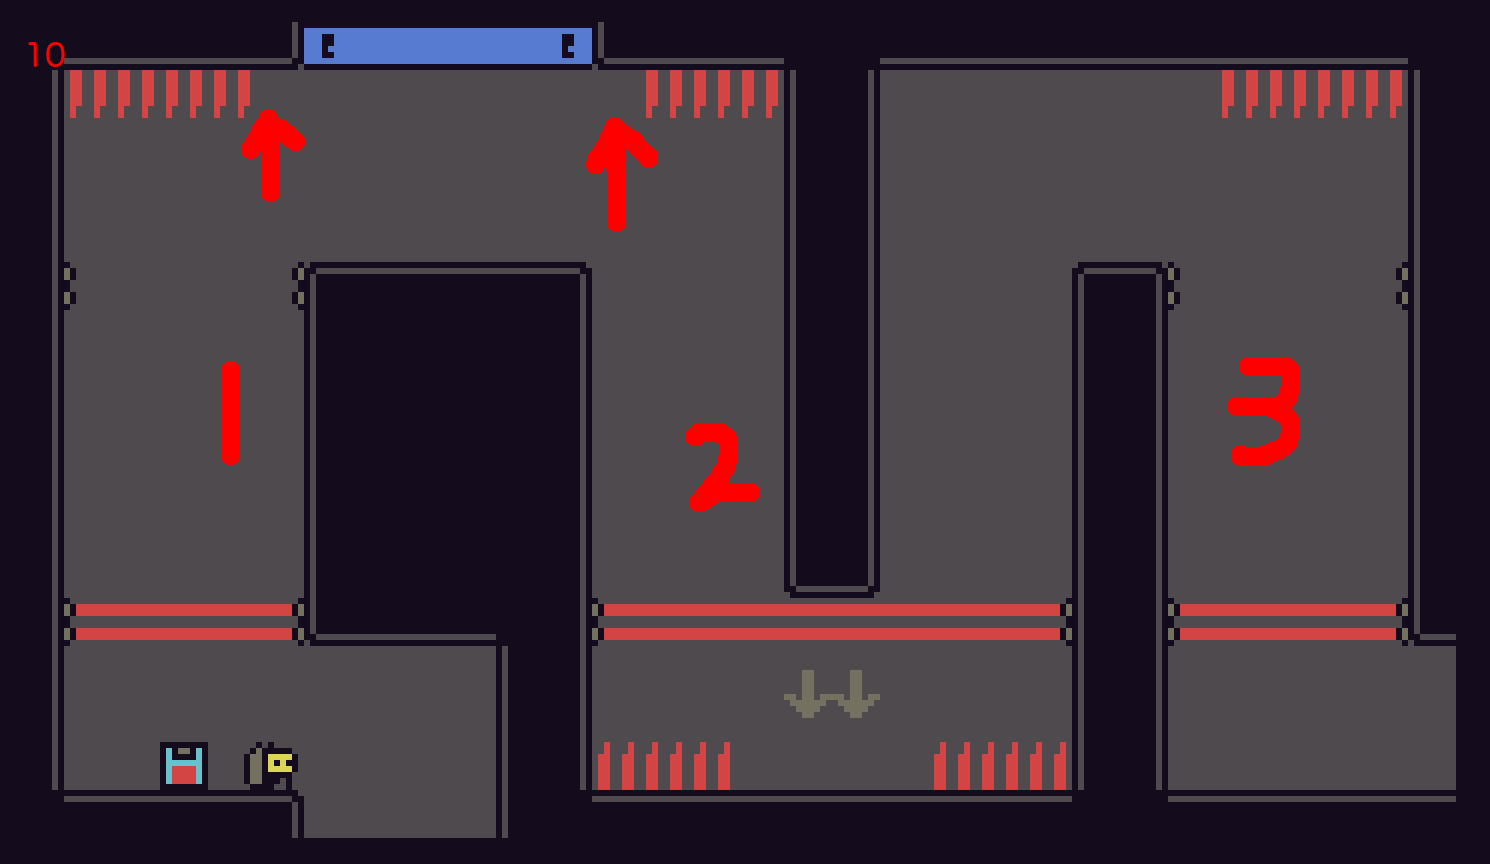
Room1: The player starts in this room after a white flash and a camera shake. The white flash and the shaking effect were added later in the game to convey the story of the game: the house is falling apart and you need to flee from it. The room was designed to give the player space to experiment with the controls in a safe environment. The room has one exit at the top to force the player to learn the main core mechanic of the game: Flying. I added the background arrows at the top of the room after receiving feedback that players didn’t know where to go or what to do. This background hint forces the player to experiment until they figure the flying mechanic.
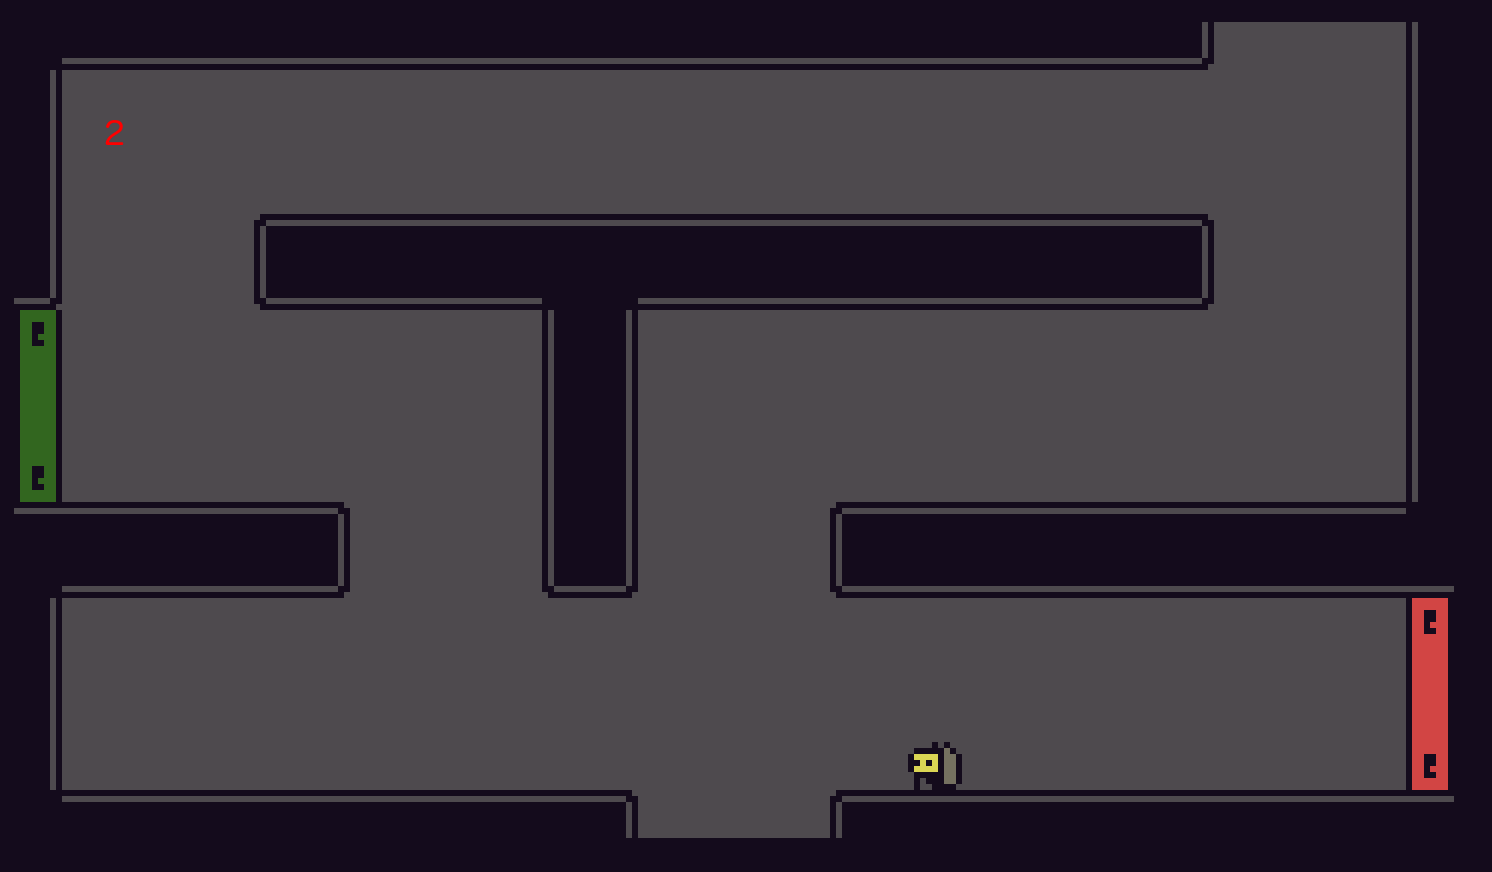
Room2: This room doesn’t have any challenges, but it tempts the player by showing the colored doors. These doors help the player to make a mental note that they need to come back here after figuring a way to open them. The winding room forces the player to use – and get used to – the controls before introducing the first challenge. This room focuses mainly on the “Move” verb as the player learned how to fly in the previous room. The ascending structure of this region makes the player understand that flying is the main game mechanic.
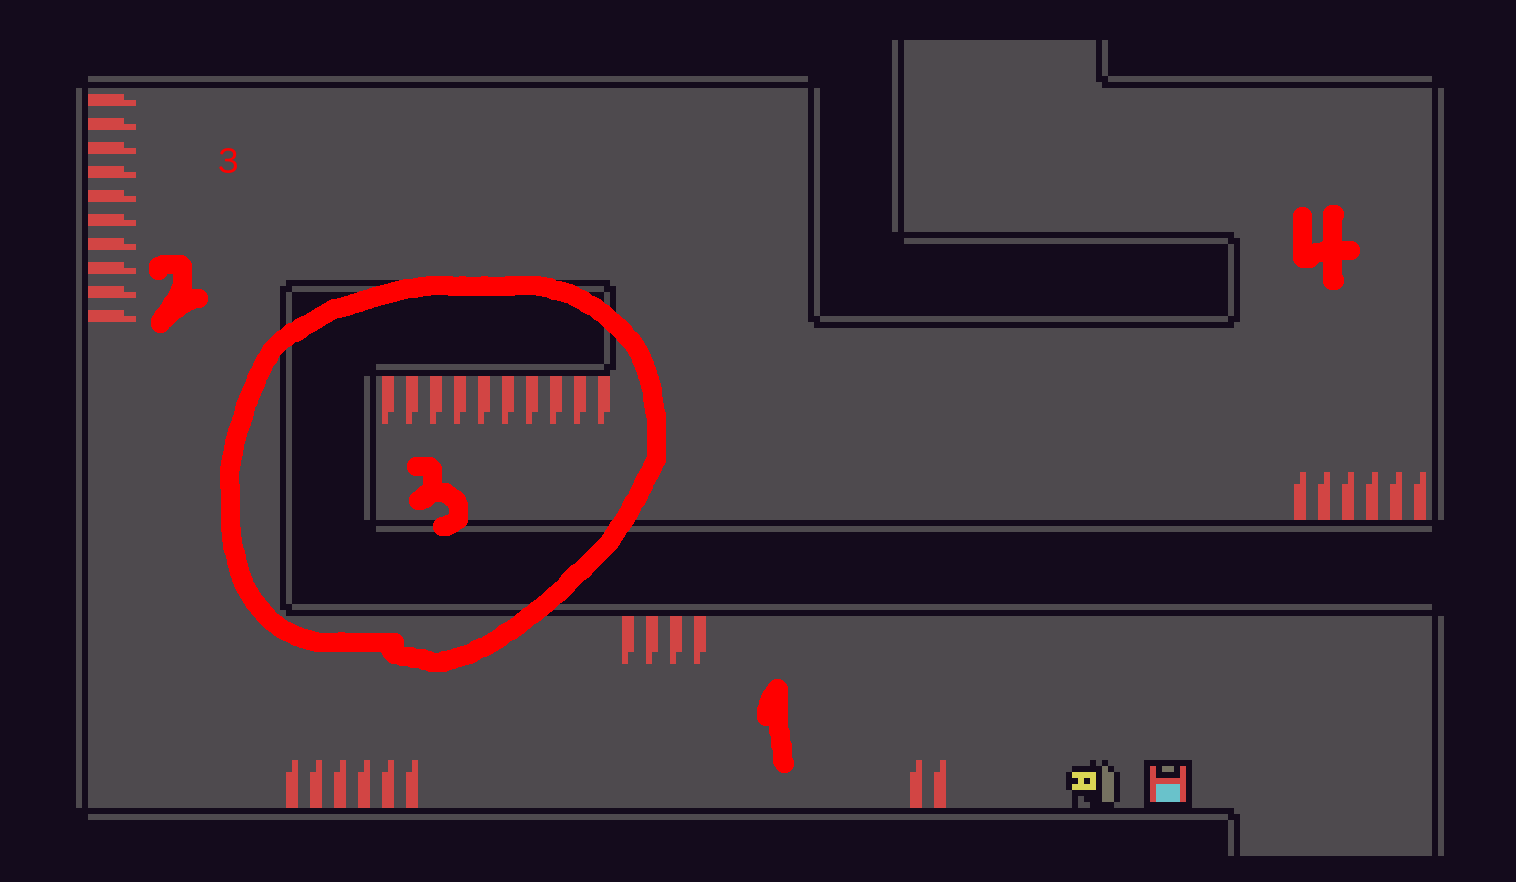
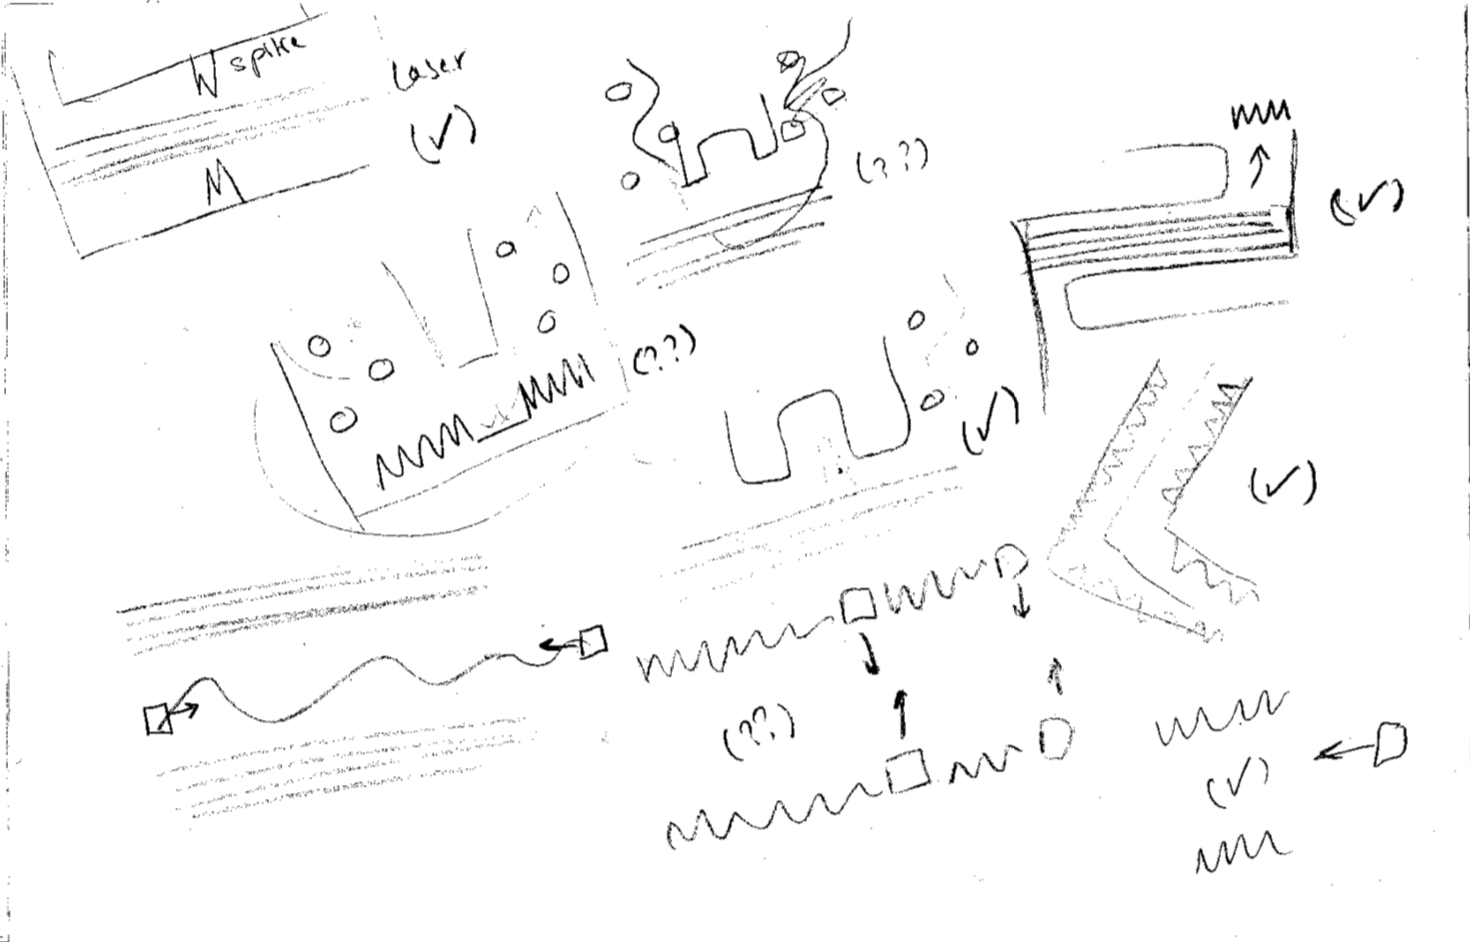
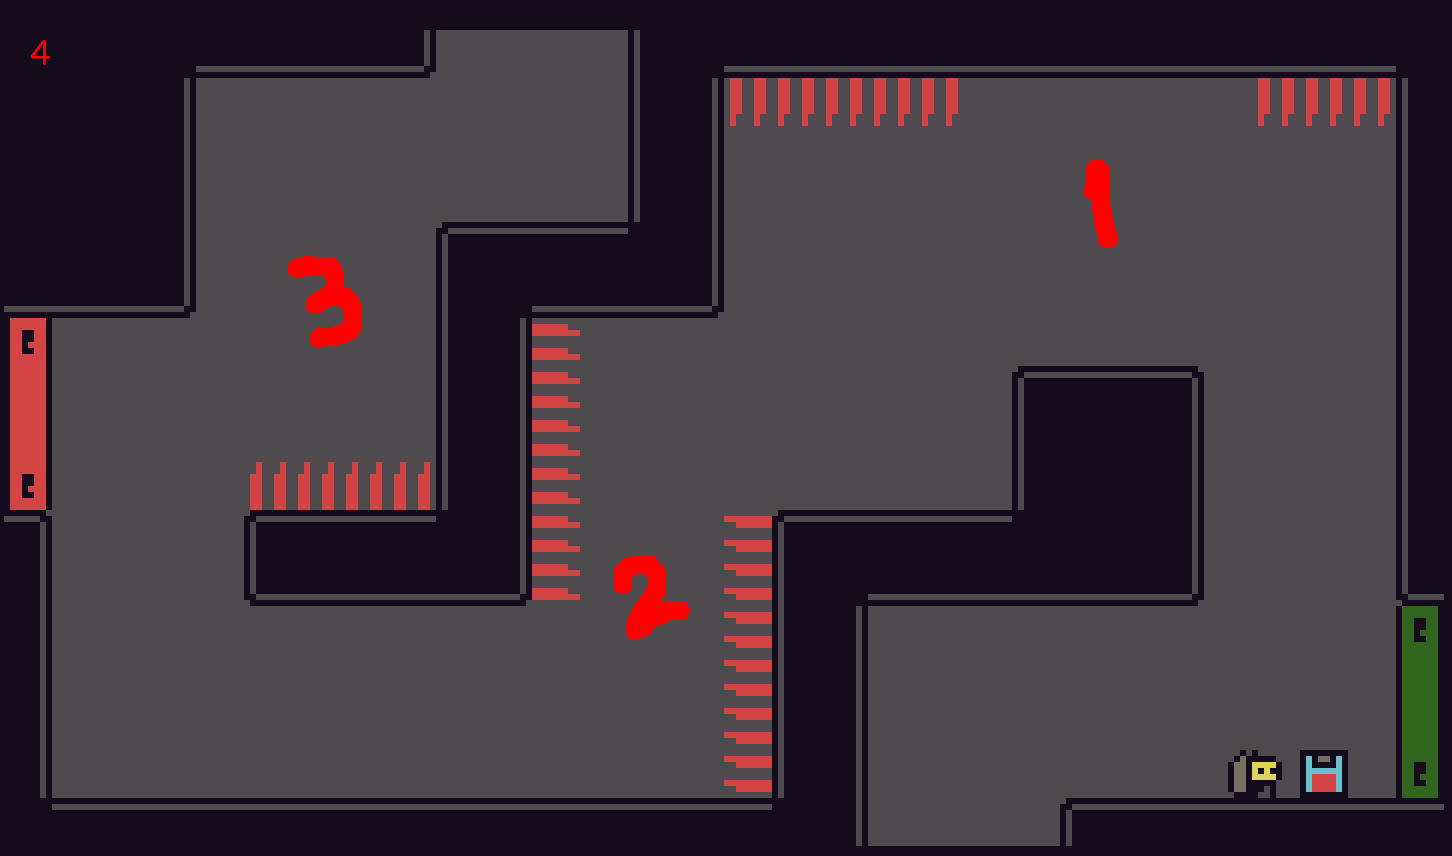
Room3: This room can be divided into four sections as labeled above. Section 1 is the starting point where spikes are introduced and used in different ways. The first set of spikes shows the player that it is harmful, thus its close proximity to the save point. The second set of spikes is on the ceiling to show that the spikes can be anywhere. It also forces the player to land before the upcoming challenge. The third set of spikes is wider than the first and second to show the player that not all spikes can be passed by jumping; sometimes you need to fly to pass them. Section 2 is an ascending section with spikes on the left which help to move the player away from them to the right. Moving to the right while flying in this area, the player might stumble upon Section 3. If not, Section 3 is designed to make the player wonder why there are spikes on top of what appears to be a dead end. This wondering might make the player try to walk towards it and, “TA-DAAA!”, they will find that the game contains “fake walls” which the player can move through. Multiple people were confused by that when the game was released thinking it might be a bug. One solution might be to draw the player’s outline when they are behind the wall, but due to the limitations of “TIC-80,” I decided to keep it as is. Section 4 increases the difficulty of the game presenting the challenge that the player may die if they stop flying and fall down.
Room4: This room adds more challenges and shows two new colored doors similar to the ones in Room2 showing the player that there is a lot of branching in the game. They also help to avoid backtracking. The room is divided into three sections. Section 1 ensures the player is capable of moving and flying. They will need to fly in an arch to the left, careful not to touch either set of spikes. Section 2 helps the player to understand the speed of their movements. If the player moves too fast, they might hit the spike wall and die. This presents another challenge on the way back as the player can’t just keep holding right, they need to fly at the correct moment to steer clear of both spike walls. Section 3 is a similar version of Room3‘s last challenge, which tells the player that they need to be cautious while playing this game. This is not as much of a challenge on the way up to the next room as one can simply fly over these spikes. On the way back, however, if the player falls down carelessly from the room above, these spikes may present more of a problem.
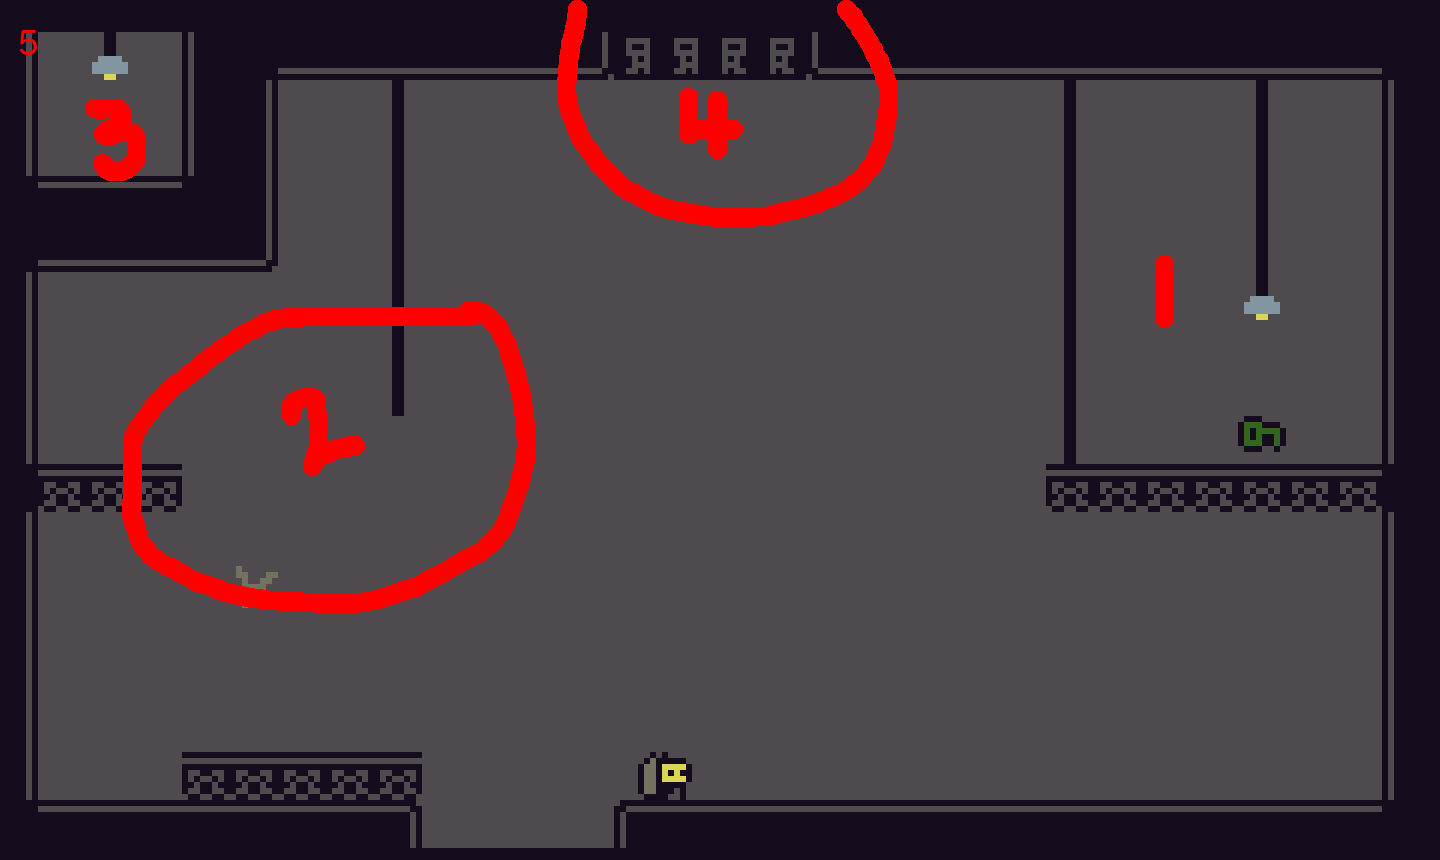
Room5: This room contains lots of hints that the player needs to notice. I divided them into four sections. The green key in Section 1 lets the player associate that this key will open all of the green doors that they saw before, simultaneously. The key is on the right, forcing the player to press left when backtracking, possibly causing the player to fall on the spikes in the previous room if they aren’t paying attention. Section 2 is more cosmetic, but it lends to the idea that the building is falling apart. Section 3 hints to a secret area that the player might access later in the game. Notice that the lamp is seemingly connected with the room above. Is this a dead end? Or is the left wall fake like the wall encountered in Room3? Section 4 shows a door with mirrored glyphs that will be explained later in the game.
By finishing Room5, the player has completed the first region in the game. Notice that Region 1 is designed to be ascending to emphasize and introduce the Flying mechanic. It indicates that the game has multiple branches and paths to choose from whenever the player unlocks a colored door. Finally, it sets the precedent that red objects with no outlines (such as spikes) are dangerous and that doors can be unlocked using the corresponding colored keys.

Room6: Players enter this room by unlocking the green door and are immediately introduced to a new challenge: the laser. Players should notice upon entering that the red exit door is closed suggesting that they return after acquiring the red key. “But why enter this room at all?” players have asked. In the lower right hand corner appears a coin that is blocked off. If the player has figured out that the game contains fake walls, they may try to find a way through the ones around the coin. We will discuss the room a bit more later.

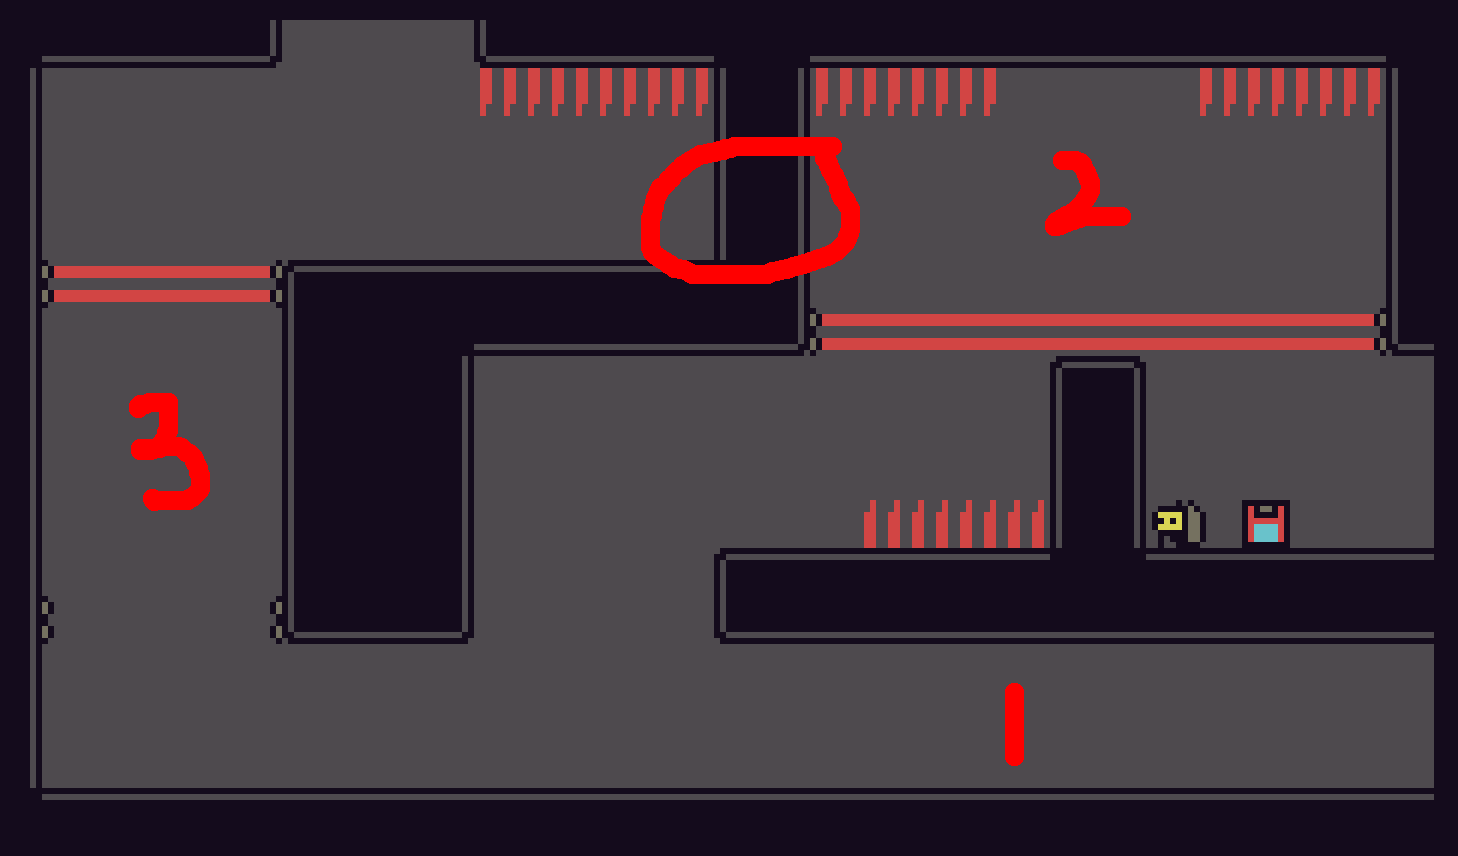
Room7: This room is divided into three main sections. Section one contains the first laser challenge the player must pass to advance which is fairly easy as all they need to do is descend through the laser when it turns off. The grey arrows in the background are to notify the player that they can drop fast by pressing the down arrow when they are gliding which is a handy mechanic. The second section has an unlocked green door protecting an empty area in which, if they choose to explore, they will find a fake wall they can pass through creating a shortcut between Room7 and Room2. (This is a more obvious hint to the fake wall feature for players who may have missed it in Room3.) Now, if we look back in Room2, you might see why that “dead end” under the green door looks so welcoming. Back in Room7, the laser challenge in section three proves to be a bit harder, requiring the player to master the Fly mechanic and understand how the laser’s on/off patterns work. The player needs to time it perfectly so that they fly up before the laser on the ground turns on, but not too soon that they bump into the upper laser before it turns off. The circled ceiling was added later to make this challenge a bit easier. Now, the player can just keep flying close to that ceiling until the upper laser switches off, then fly up.
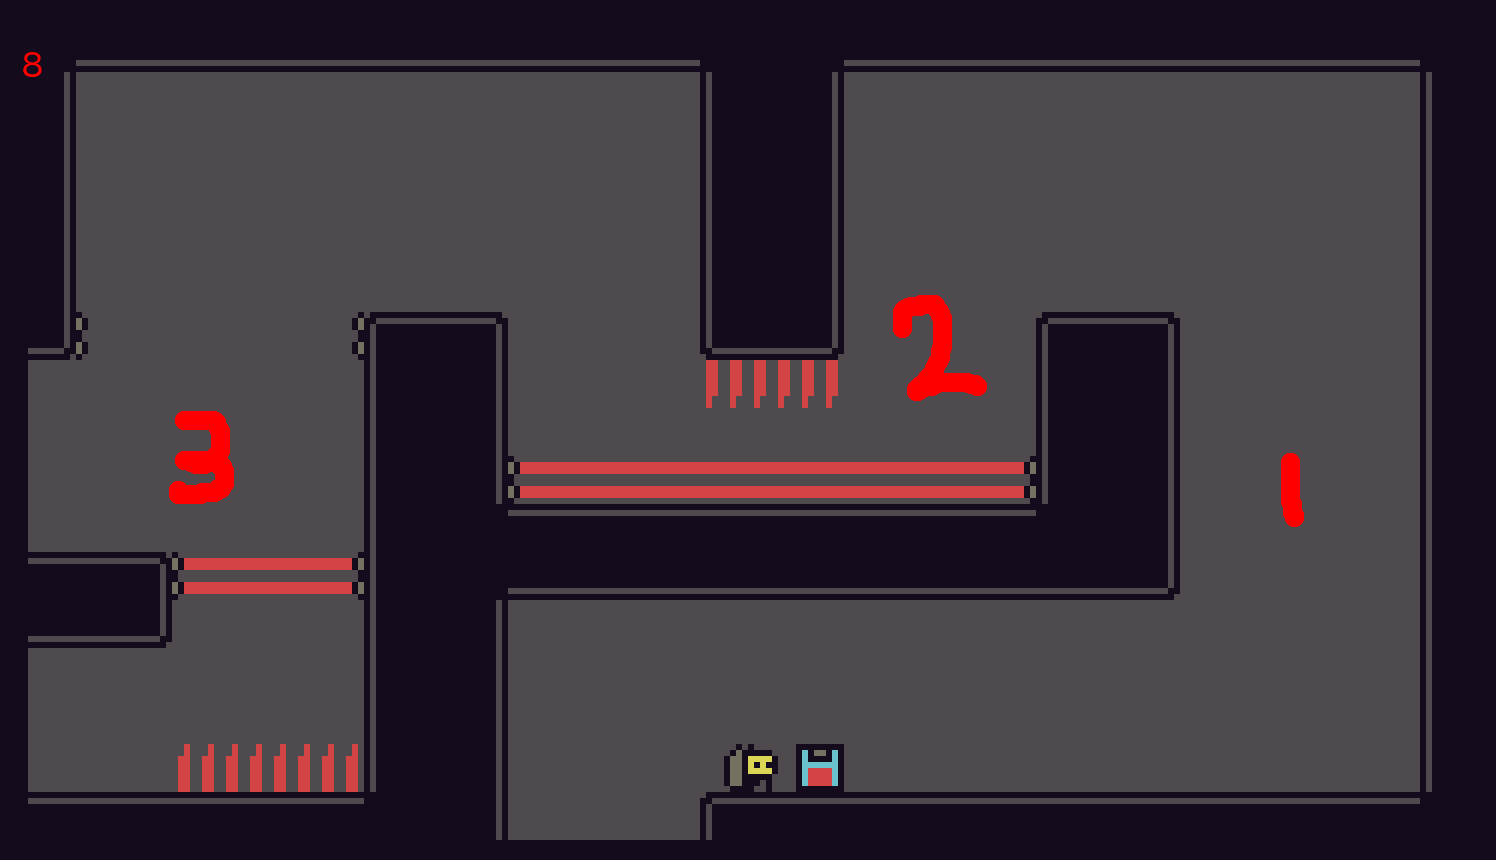
Room8: This room is also divided into three sections. The first gives the player a moment to relax – a release from the tension of the previous room – and prepares them for the core challenge of that room: Section 2. This section revolves around understanding several mechanics (moving, flying, and laser timing). The player needs to run fast and, as soon they pass from under the spikes, fly once again before the laser reappears. If the player flies too late, the laser will kill them and if they fly too early, they will hit the spikes. There used to be spikes on the ceiling after this challenge, but I removed them to focus on the core challenge (and to give the player a break once they manage to do it!). Section 3 is a simpler challenge where the player must keep flying until the perfect time and then drop to the top platform (similar to the first laser challenge in Room7). The unique part about this section is that it has two exits, the upper exit being easier to reach than the lower.
Room9: The first section of this room has two paths: the upper path (which is easier to reach from the previous room) and the lower path. I wanted to reward the player for taking the lower path (the harder one), and did so by designing the lower path with no challenges, but here is also no save point. Later, however, I realized that the player can go save in the upper path, then go back and take the lower path to skip the challenge. So, instead of an open path, I made a secret fake wall (circled above) which allows daring and observant players (who might notice a “pointless” dead end decorated with spikes) to skip the last challenge. Section 2 tests the ability of the player to fly and keep the character up between the spikes until the laser flips off when they are able to glide safely over the lower spikes onto the platform. Section 3 is Room9’s final challenge. Similar to the third challenge in Room7, the player needs to master the flying mechanic to carefully float between the two lasers until the top one turns off. Unlike Room7, however, there is no wall, ceiling, or floor to keep you safe while waiting for the lasers.
Room10: This room is the last challenge room in this region consisting of another three sections. Section 1 is similar to the last challenge from the previous room, but with spikes added to the top to punisher the player for overshooting. The red arrows point to areas that used to have spikes, but to make the game easier and more accessible, I removed them. One can just fly on the extreme right wall of this section and straight up to pass this challenge without hitting the spikes in the ceiling. Section 2 challenges the player’s landing skills and aim. The easiest way to pass? Start by gliding down the right side of the wall until the laser disappears, then drop fast (by pressing the down arrow) landing in between the two sets of spikes before the laser flips on. Once the laser disappears again, quickly fly up and on towards Section 3. For those who might not remember about the “fast drop” via the down arrow, the arrows drawn in the background are there as a hint. Section 3 seems identical to Section 1, but now the player must face the opposite direction. Instead of flying between lasers until they go off, they now need to glide down. Once again, using the down button to drop fast is very useful. This room is designed to reinforce the “fast drop” mechanic.
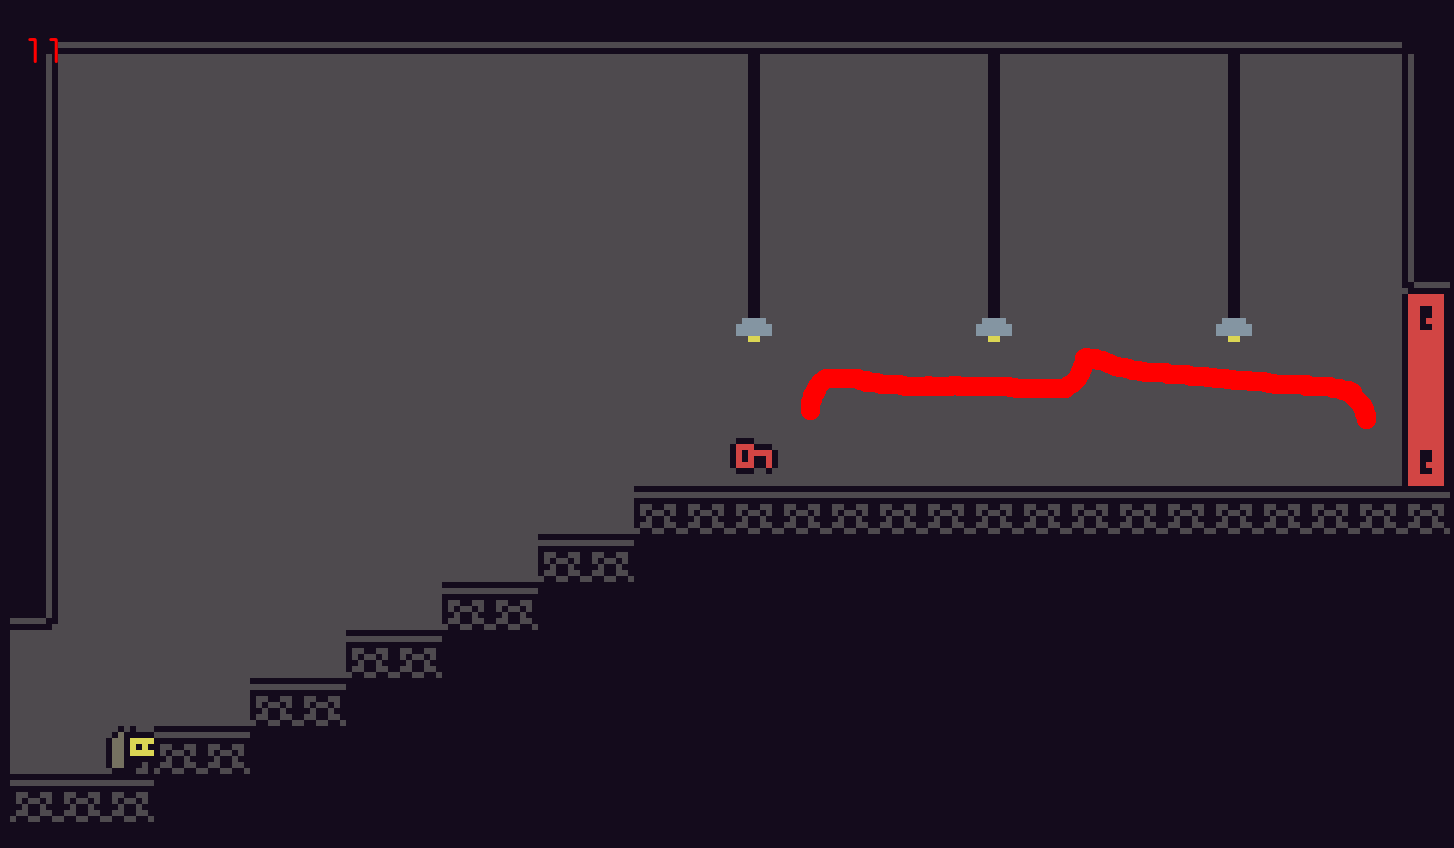
Room11: This room finally gives the player the red key which will open all of the red doors in The Sky House. I decided to put the key at the top of the stairs to make the player walk – not fly- to the right while exiting the room back into Room4. This protects them from potentially landing on the spikes if they exit the room by flying and guides the player toward their next destination: Room6. If you look back through the diagrams, you may notice Room6 and Room10 present similar challenges. Being that players most likely didn’t experience Room6 (due to the locked door at the exit), the natural progression would be to make Room6 a bit harder.
By finishing Room11 the player has finished the second region of the game. This region focuses mainly on raising the stakes as the player has now mastered the core verbs. Lasers are introduced that require more precise flying controls (flying up or gliding down). Mixing the spikes with the lasers helped in creating challenges that are difficult and tests the player’s accuracy, timing, and aim.
This is the perfect place to stop for now. I hope this post has been helpful and insightful, especially to new game developers/designers. Be sure to check back soon for the next post in this three-part series on my game, “The Sky House“.
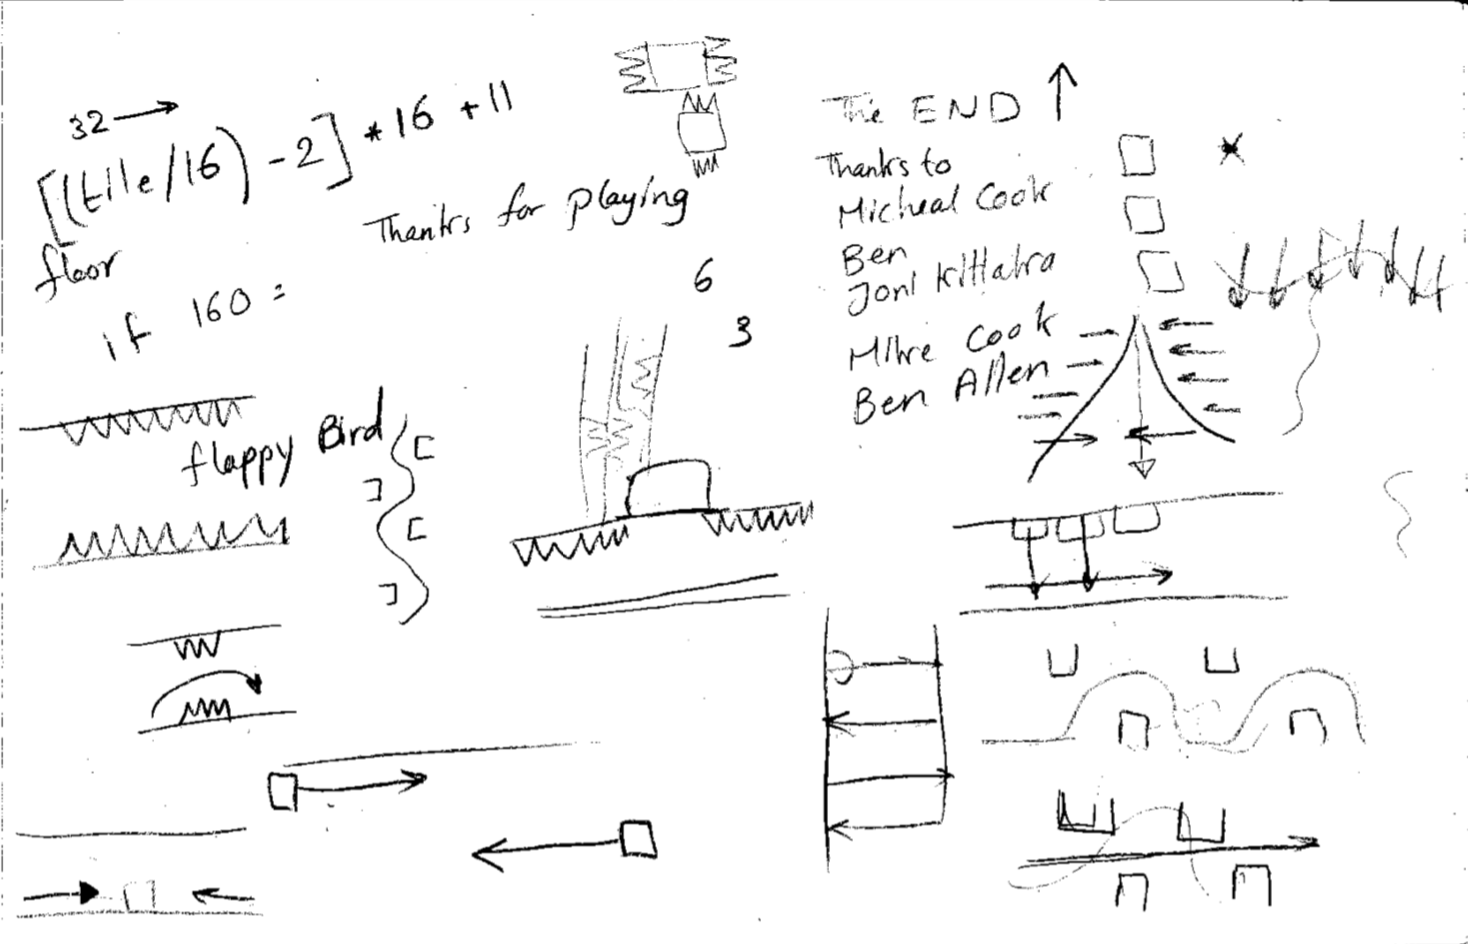
Many thanks to Christopher Michaels for all the help in editing this blog post.
To be continued…
- The Sky House Design – Part 2 (coming soon)
- The Sky House Design – Part 3 (coming soon)
Very detailed description 🙂 , I might not be a fan of precision platforms, but how you explained everything is amazing 😀 . On a side note, I reached room 8 without knowing anything about the fast down, even the hints of two arrows did not help, because I though it was just pointing to where I should go
Yeah, from play testing, I noticed that most of players stumbled upon that mechanic by accident rather than seeing the arrows. I am glad you liked the post.
thank you it’s very helpfull.
look forward for next article
Thanks, glad you liked it 🙂